Great Scott! I'm grafting!
I think it's fair to say that I've been afraid to reattempt grafting since my failure in 8th grade science.
I don't remember whether it was a B- or a C+ I got on my project. I do remember that it hurt, since it was, I felt, "considerably lower" than what I was
 used to getting as a science-minded youth.
I suspect it was November when we were told we had a science project due in January. The choice of project was ours. It was now December (and I think it was even during the Christmas school break) and high time to pick a project. I thought of the wild citrus my folks had let grow in our front yard. Someone in the family nicknamed it a "limerine" (LIM-uh-REEN) as in "lime crossed with tangerine." That was far too kind of a name for what a fruit that, though appealing with its bright orange skin, was nasty
 sour-bitter. The project I chose was grafting, to graft a good lemon branch onto the limerine. Wouldn't it be cool to redeem this plant with at least one branch producing something of value!
We lived along the coast near Los Angeles. Winters were cool but there wasn't frost. I figured that might work in my favor. I reviewed the gardening book. My brain readily received the messages about how to cut into the main branch and how to shape the part to graft into it. My brain
 ignored whatever information there might have been about timing. I made the cuts, stuck this in that, tied stuff securely, gooped it up with pruning tar.
A couple of weeks later, the report was due. I could see no change in the graft. I had nothing to write about except to describe what I had done and what I hoped would happen. Well, I shouldn't have been surprised to get the disappointing mark nor see the teacher's note about how unreasonable it was to expect results in such a short period.
 The graft never did take.
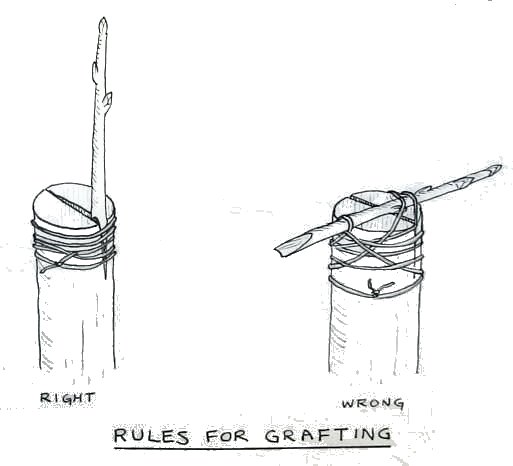
On reflection, I have been fascinated by grafting my whole life. I have remained interested in the topic, despite my failure in junior high. When flipping through gardening books, I'm likely to pause on the section about grafting and review the illustrations on the various ways folks graft plants. (Readers' Digest produces such wonderful line drawings of how to do things. One of their drawings influenced this cartoon I drew in 1982.)
The failure of my grafting experience in junior high lodged that little
 doubt in my mind that I could ever succeed at grafting. I have tackled and succeeded at so many other gardening concepts that I'd think I would've been more willing to experiment. But I haven't been.
Today, I grabbed a book off my shelf, a book on Bonsai. My brother-in-law Scott mailed a couple of these treasured books to me before he died (just two years ago) knowing I shared his interest in trees and pruning. Making my way through it, I came across a section on grafting. I lingered on that for some time, backing up, rereading, trying to make sense of the photos plus the inadequate descriptions that accompanied them. One phrase caught
 my eye: "...February or March, while the buds are still dormant." Hey, I was in March. In an instant, I was thinking it was prime time I tried a graft.
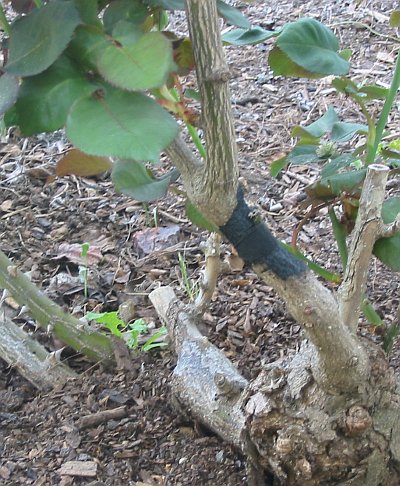
Mom has had few-years-old rose plant among her rose bushes that shoots out these really long branches before producing one or two blooms. Her other rose bushes are standard height and pump out blooms. That one rose bush is just stupid. She also has a new rose bush planted last summer. I chose the
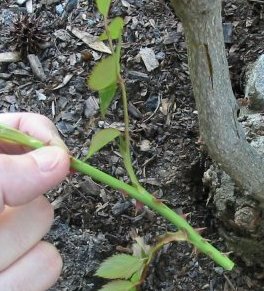
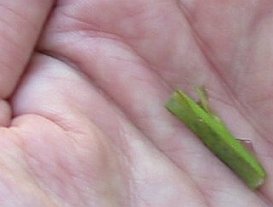
 stupid rose bush as the base and snipped a fresh twig from the young bush.
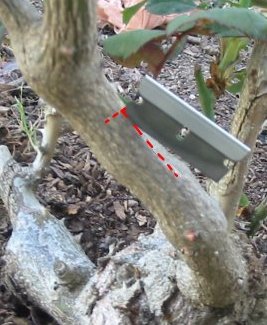
Out of all of the grafting styles, the one I chose was the T cut with a bud shield. (Coincidentally, this is the same approach I used on the limerine.)
The cambium layer for a branch or trunk is "the only living tissue" through which the nutrients are passed. And for a tree, the outermost part is called the "cork cambium". Picture a banana still in its peel. If I'm understanding right, the peel would be the cork cambium, and the surface of the edible part of the banana would be the cambium layer we care about.
 For a branch, supposedly the center stuff is dead tissue. So, the really important thing in grafting it getting the new graft's living cambium layer touching the living cambium layer of the base plant.
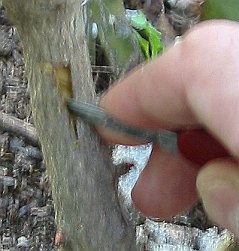
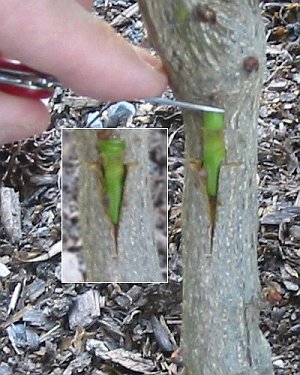
With a razor blade, I cut a T shape through the bark...through the cambium layer. I couldn't tell, from any feeling I got through cutting with the blade, how thick the cambium layer was. But I knew that I should be able to peel it back from the inner core of the branch, kind of like there is that difference between the banana and its peel. With my little knife, I poked
 and pried until I found that separation.
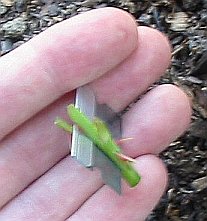
The bud shield, if I understand right, is to be carved from where a bud would naturally form along the twig: where a leaf is or has existed along the twig. So, I chopped the twig down to just the portion containing the bud location. Successful grafting involves the cambium layers of the base and of the little graft thingy coming into and remaining in contact so that the little graft thingy is adopted by the base, forming plant cell this and that, and the bud grows. Well, at least that's what I'm hoping for. And, so, I need to expose the cambium layer of the little graft thingy. I split the stem with the razor blade. There it was. Fresh "shield" of a graft thingy, ready to insert into the T cut on the base rose bush.
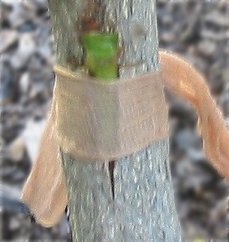
After jamming the shield into the T cut, I pressed the T flaps a little
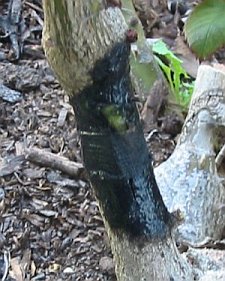 more snuggly onto the shield a few times, a symptom of my being new at this and wondering if I should expect something different. Well, the book said the graft needs to be tight and free from getting water in it. Years ago, sister Jan talked Mom into turning some old nylons into a big source of little flexible garden ties. I cut a little strip and tied it tight around the flaps.
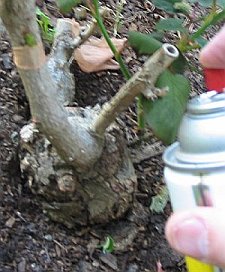
As for water-tight, I went for the old pruning spray.
Well, the graft is done.
My gosh, I did it! It's been 36 years since I last attempted to graft something. Will this work? I have no idea. But I'm hopeful. And when it starts growing, I will shout with joy and relief or vindication or something and will update this blog post with a photo.
[Day 2: Drat. It appears I did it wrong. You can see I only slipped it in partway. I thought that was right. But that means that the top end is not touching the inner cambium layer. I should have trimmed the little thingy down so it could fit entirely under the flaps, with the potential bud part of it sticking out in the center. I now wonder if an "I" cut would've been better than a "T" cut, for the resulting "double doors" would have let me seat the little graft thingy better and I could have tied tightly above and below it. But I didn't. So, on Day 2, I added a bit more pruning tar on the top end to ensure no more moisture slips out the top end of my cutting.]

 face" video I recorded at friend Jim's bachelor party (I'd painted a goofy face on Jim's chin and he laid on his back for a video camera to capture him lip-synching Beethoven's Joyful Joyful). David, an illustrator, was ready to take it up a notch. He painted faces on several of our chins, and I did his chin and Mom's. We sat comfortably upright in front of a video camera mounted upside down, hooked to TV so we could see what expressions we were creating. (Poor Dad: we assigned him some funky Michael Jackson song he didn't know. Made us all laugh.)


